Added to Your Cart
Sorry, unfortunately this product is currently out of stock. Add it to your wishlist to receive a back in stock email notification.
Other customers purchased instead

PMD Personal Microderm Classic - Teal
HK$1232.25

Personal microdermabrasion tool comes with two different sizes of disc attachments, offering two different grits for exfoliation. Vacuum action in the tool sucks the skin into the rotating disc, bringing blood flow and collagen to the surface. Removes the thin layer of dead skin cells so that rejuvenation creams and serums can sink deeper into the skin and work more effectively.
Benefits:
- Greatly enhances poor, dull skin texture by gently resurfacing the superficial skin layers.
- Softens and modifies fine “expression” lines typically seen on the forehead and around the mouth.
- Polishes and reduces fine, crêpe lines on the cheeks generally caused by aging and sun damage.
- Smoothes pigment changes or skin discoloration.
- Contracts enlarged pores; exfoliates and suctions out clogged pores in case of acne.
- Polishes and smoothes out the margins of acne and burn scars; usually requires 10 initial treatments.
International Customers: Please note this item is a 110V electrical device.
Step 1: AssemblyPlace disc on motor shaft. Simply push on tightly. To remove; PullOff. Important: There are 2 disc sizes. One for the body and onefor the face. See recommended usage below. Place the cap overthe disc. Screw 1/4 turn and seal tight. There must be a seal inorder to create the vacuum and suction. Connect cord to unit andpower supply and plug in.
STEP 2: Wash Your SkinCleanse and Wash. Remove all oil, makeup, and dirt. Make sure your hair is out of the way andcovered or pulled back off of your face.
STEP 3: TechniquePull skin tight for a smooth surface. Place your fingers on the skin and stretch theskin so that it is tight where the tip will make contact with the skin. Keep the unitmoving constantly over your skin.Do not hover in one spot.Be sure the cap is flush with your skin, maintaining even contact. This will ensure aproper suction. The motor sound will change when suction occurs.Small Disc: Use the small disc around tight spots on the nose or where your boneswill not allow suction. The large disc should only be used on the body and not on theface.
STEP 4: TreatmentUse light pressure with early treatments. As you become skilled with this tool you can become moreaggressive and use more pressure. Be careful not to grind to deep. Move the disc in upward andhorizontal motions until you have treated all areas of the surface. If you have trouble spots take alittle more time on these areas. Be careful not to press to hard or stay to long in one place. Keep thedisc moving over the surface or your skin.
STEP 5: Cell RenewalCell rejuvenation and renewal serums and creams are essential to the healing process andrecovery. Use your choice of products daily in between treatments.
STEP 6: Follow-Up and MaintenanceClean the filter and residue out of the cap and motor shaft. Clean with a damp cloth in andaround motor shaft.Replace discs after every two to three treatments. For maximum effectiveness, the abrasive on thediscs must be fresh.Recommended usage: Once a week.Note: The green disc has a coarse grit for more aggressive treatments. The blue has moderate grit.
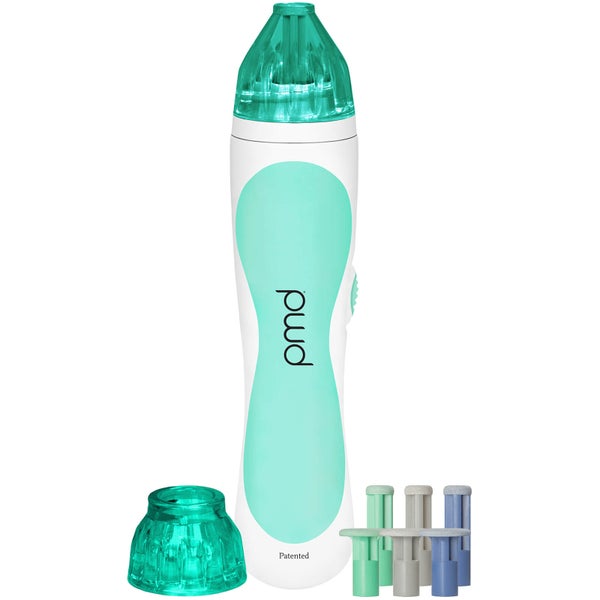
One Personal Microderm Unit. 6 discs - 2 green, 4 blue, with 2 sizes of caps. One electrical cord. One reusable filter.
PMD Personal Microderm Classic - Teal
HK$1232.25
Sold out
Personal microdermabrasion tool comes with two different sizes of disc attachments, offering two different grits for exfoliation. Vacuum action in the tool sucks the skin into the rotating disc, bringing blood flow and collagen to the surface. Removes the thin layer of dead skin cells so that rejuvenation creams and serums can sink deeper into the skin and work more effectively.
Benefits:
- Greatly enhances poor, dull skin texture by gently resurfacing the superficial skin layers.
- Softens and modifies fine “expression” lines typically seen on the forehead and around the mouth.
- Polishes and reduces fine, crêpe lines on the cheeks generally caused by aging and sun damage.
- Smoothes pigment changes or skin discoloration.
- Contracts enlarged pores; exfoliates and suctions out clogged pores in case of acne.
- Polishes and smoothes out the margins of acne and burn scars; usually requires 10 initial treatments.
International Customers: Please note this item is a 110V electrical device.
Step 1: AssemblyPlace disc on motor shaft. Simply push on tightly. To remove; PullOff. Important: There are 2 disc sizes. One for the body and onefor the face. See recommended usage below. Place the cap overthe disc. Screw 1/4 turn and seal tight. There must be a seal inorder to create the vacuum and suction. Connect cord to unit andpower supply and plug in.
STEP 2: Wash Your SkinCleanse and Wash. Remove all oil, makeup, and dirt. Make sure your hair is out of the way andcovered or pulled back off of your face.
STEP 3: TechniquePull skin tight for a smooth surface. Place your fingers on the skin and stretch theskin so that it is tight where the tip will make contact with the skin. Keep the unitmoving constantly over your skin.Do not hover in one spot.Be sure the cap is flush with your skin, maintaining even contact. This will ensure aproper suction. The motor sound will change when suction occurs.Small Disc: Use the small disc around tight spots on the nose or where your boneswill not allow suction. The large disc should only be used on the body and not on theface.
STEP 4: TreatmentUse light pressure with early treatments. As you become skilled with this tool you can become moreaggressive and use more pressure. Be careful not to grind to deep. Move the disc in upward andhorizontal motions until you have treated all areas of the surface. If you have trouble spots take alittle more time on these areas. Be careful not to press to hard or stay to long in one place. Keep thedisc moving over the surface or your skin.
STEP 5: Cell RenewalCell rejuvenation and renewal serums and creams are essential to the healing process andrecovery. Use your choice of products daily in between treatments.
STEP 6: Follow-Up and MaintenanceClean the filter and residue out of the cap and motor shaft. Clean with a damp cloth in andaround motor shaft.Replace discs after every two to three treatments. For maximum effectiveness, the abrasive on thediscs must be fresh.Recommended usage: Once a week.Note: The green disc has a coarse grit for more aggressive treatments. The blue has moderate grit.
One Personal Microderm Unit. 6 discs - 2 green, 4 blue, with 2 sizes of caps. One electrical cord. One reusable filter.